Search Blog
Recent Posts
-
 Ecommerce SEO for Google &...
Learn how online stores can improve visibility in Google, AI Overviews, ChatGPT, Gemini, and other AI search...
Jun 8, 2026 Read more
Ecommerce SEO for Google &...
Learn how online stores can improve visibility in Google, AI Overviews, ChatGPT, Gemini, and other AI search...
Jun 8, 2026 Read more -
 How to Use PrestaShop...
This blog post looks into how you can use prestashop modules effectively and how you can enhance your store's...
May 5, 2026 Read more
How to Use PrestaShop...
This blog post looks into how you can use prestashop modules effectively and how you can enhance your store's...
May 5, 2026 Read more -
 Best Shopping Cart for SEO...
This blog compares the best shopping cart platforms for SEO in 2026, including Shopify, WooCommerce, Magento,...
Apr 20, 2026 Read more
Best Shopping Cart for SEO...
This blog compares the best shopping cart platforms for SEO in 2026, including Shopify, WooCommerce, Magento,...
Apr 20, 2026 Read more -
 Canonical vs Hreflang Tag:...
Canonical tags prevent duplicate content by selecting a preferred page, while hreflang tags target language and...
Apr 13, 2026 Read more
Canonical vs Hreflang Tag:...
Canonical tags prevent duplicate content by selecting a preferred page, while hreflang tags target language and...
Apr 13, 2026 Read more -
 PrestaShop 9.1: A Major...
Learn what’s new in PrestaShop 9.1, including performance upgrades, modern architecture, and improved developer...
Apr 6, 2026 Read more
PrestaShop 9.1: A Major...
Learn what’s new in PrestaShop 9.1, including performance upgrades, modern architecture, and improved developer...
Apr 6, 2026 Read more

How to Add Custom Fields to PrestaShop Product Page (Step-by-Step Guide 2026)
Posted On: May 4, 2023
Categories: Shopping Carts and E-Commerce Platforms: A Complete Guide
Are you the store owner people have been talking our ear off? The one with the most exquisite product page in the history of ecommerce prestashop stores that they can’t stop purchasing stuff? Well, let us fill you in on this!
PrestaShop is a pioneering eCommerce platform that is serving businessmen and entrepreneurs across the globe with basic to advanced functionality. Being an open-source code, the platform gives you the freedom to modify the code, personality a feature, and mold the entire design according to your business-specific needs.
For any store, the default layout or design of a product page is not sufficient to portray all its attributes. The store manager may either need to hire a developer to make the required customization or install a module like prestashop add custom field to product.
This blog post is gonna be your one-stop-solution, that can help you customize product fields or options using the PrestaShop add field to product module.
Quick Overview of PrestaShop add custom field to product
Need to add more product details, options, and questions to ask potential customers on the landing page? PrestaShop add field to product helps you add custom fields to product pages to display more information and take instructions or know the customers.
Our PrestaShop add custom field to product module allows you to add as many fields as it deems suitable for the target audience. Modify fields and options for a specific product or category.
The module offers the creation of three different types of fields. It can be text, text area, or a date. Using the data validation option, you can prevent users from entering invalid information in the fields.
Create a validation rule and it will not process the data until the user enters it in the right format. To make sure the users provide the required information you can make the relevant fields mandatory to answer.
PrestaShop custom product fields can be restricted to specific customers. That’s the beauty of Prestashop add custom field to product. Displaying additional fields to a particular customer group can help the B2B stores, where product details are different for retailers, wholesalers, and distributors. The fields and data entered in response appear on the order page and can be accessed by the store administrator from the dashboard.
How to add custom fields to product pages in PrestaShop?
Step 1: Download the PrestaShop add custom field to product module from the marketplace or FME Modules and continue to your store’s dashboard.
Step 2: Navigate to Module Manager in the back office and click ‘Upload a Module’.
Step 3: Select the file from the folder, or drag and drop it to the popup.
Step 4: Hit Configure, and it installs.

Step 5: Find and select the newly created section in the control panel named ‘Product Fields.’
Step 6: Click “Add New Field” and enter details.

Use a simple plus (+) sign to add custom fields to product pages. Program each field as a separate entity that can easily be glued to one or more products and categories.
Step 7: Write a field title.
Differentiate the new field by its unique title.
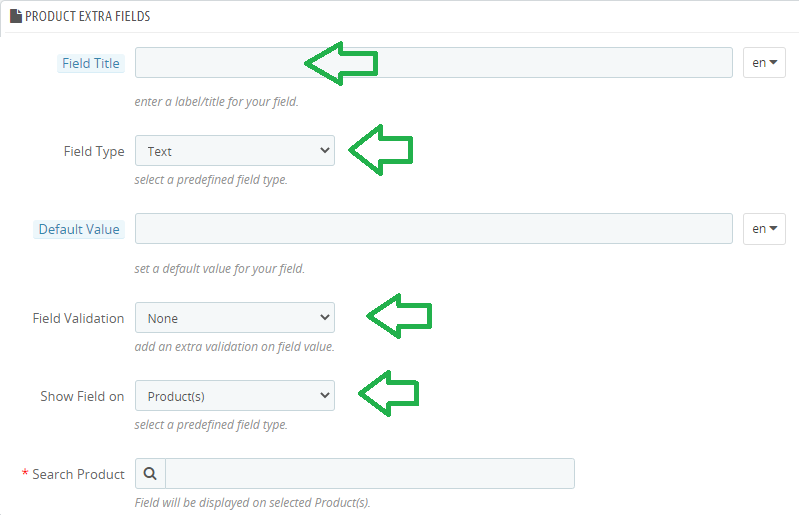
Step 8: Select field type – Text, Text Area, Date
Advance custom fields Prestashop module come with 3 different field types. Use the text field to convey a short and simple message about a product. For long messages, use the text area field. Choose data to allow customers to pick a date.
Step 9: Enable Field Validation.
Take data in numbers, decimals, strings, messages, emails, phone numbers, URLs, or dates. For example, you can validate contact details either by number or email. To take the exact size or quantity required, decimal is a suitable choice. Similarly, set a date format for validation if customers want to specify a delivery date.
Step 10: Display fields on selected products or categories
Add custom fields to selected products. You can apply it to a single product, a set of products, or multiple categories. Include them in the rule one by one.
Step 11: Allow access to selected groups of users
Display custom fields to the target audience only by using restriction rules. Specify user groups and the plugin will display them accordingly. It helps you implement a business-to-business selling strategy.

Step 12: Mark the field as mandatory
Mark the field mandatory if it has to bring out useful information from customers.
Step 13: Click Save to add and implement a custom field rule.
Step 14: Move to settings to enable the field's display on the admin order
Make the additional fields appear in the admin order as well.
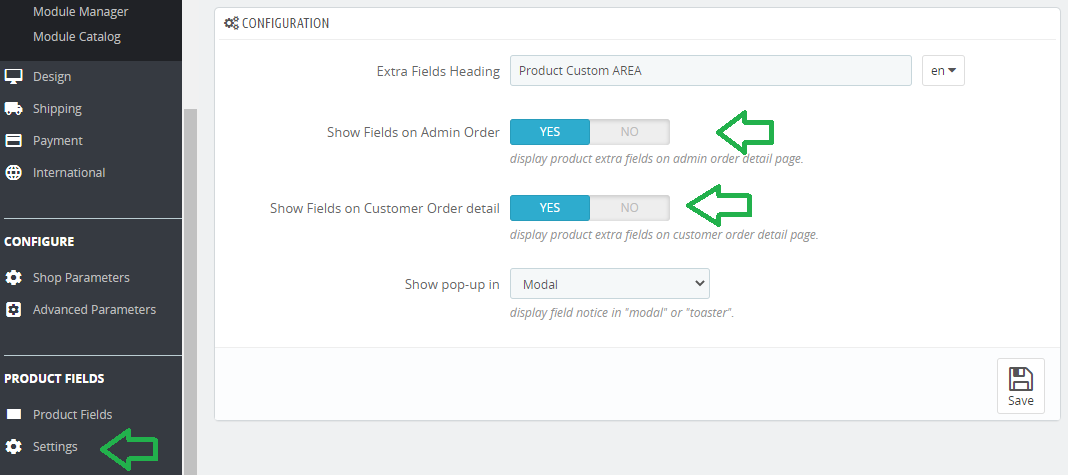
Step 15: Enable the field's display on customer order details
Carry forward the field along with the customer's reply on order details for record keeping.
Conclusion
Adding custom fields to the PrestaShop product page is simple and easy with the module. Using the step-by-step guide, provides you with a detailed tutorial. Follow and implement each step to create engaging and useful fields for the landing pages.